Setup
This chapter provides details about how to set up and use the functionality of this extension and will present several examples and scenarios to demonstrate the functionalities. A basic understanding of how to work with Microsoft Dynamics 365 Business Central is presumed.
Note
The documentation is set up based on the configuration of Status Management for Items. Except the separate paragraphes for a entity, the functionality for all entities remains the same.
Status Management
First off, we are going to create new Statuses (and later, do some further setup for these Statuses).
-
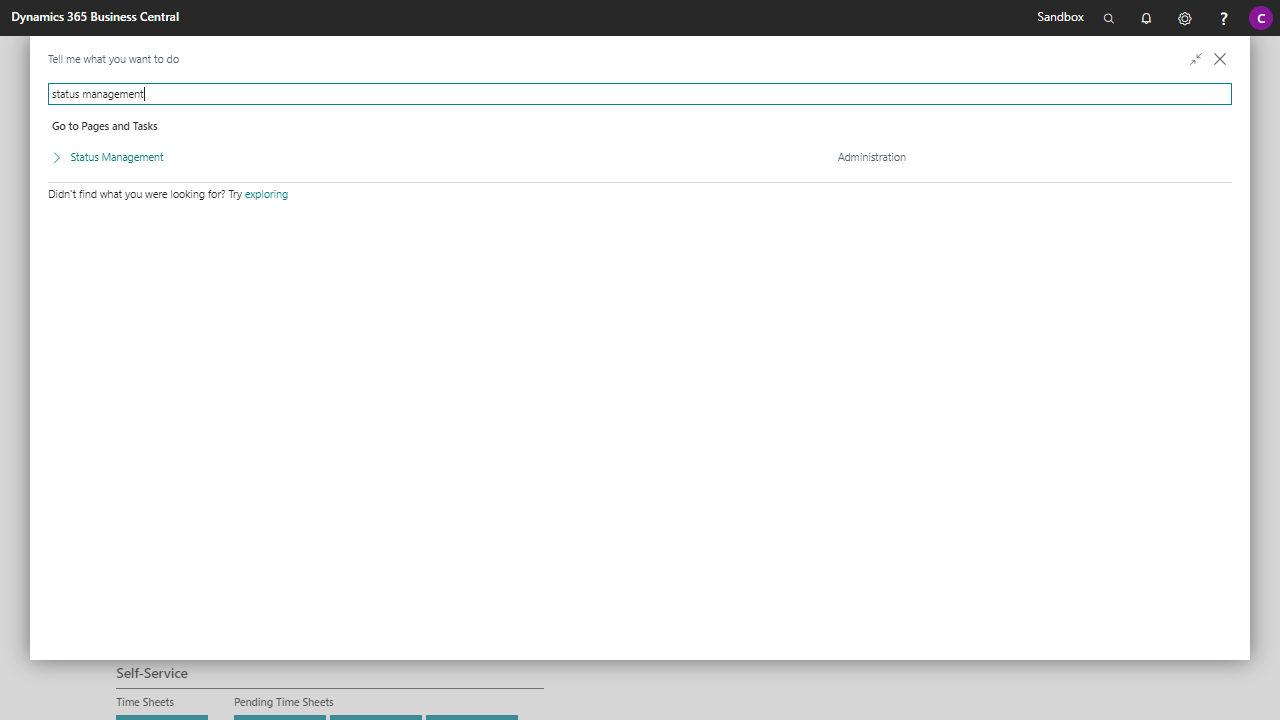
Find and open the Status Management page in Tell Me
-
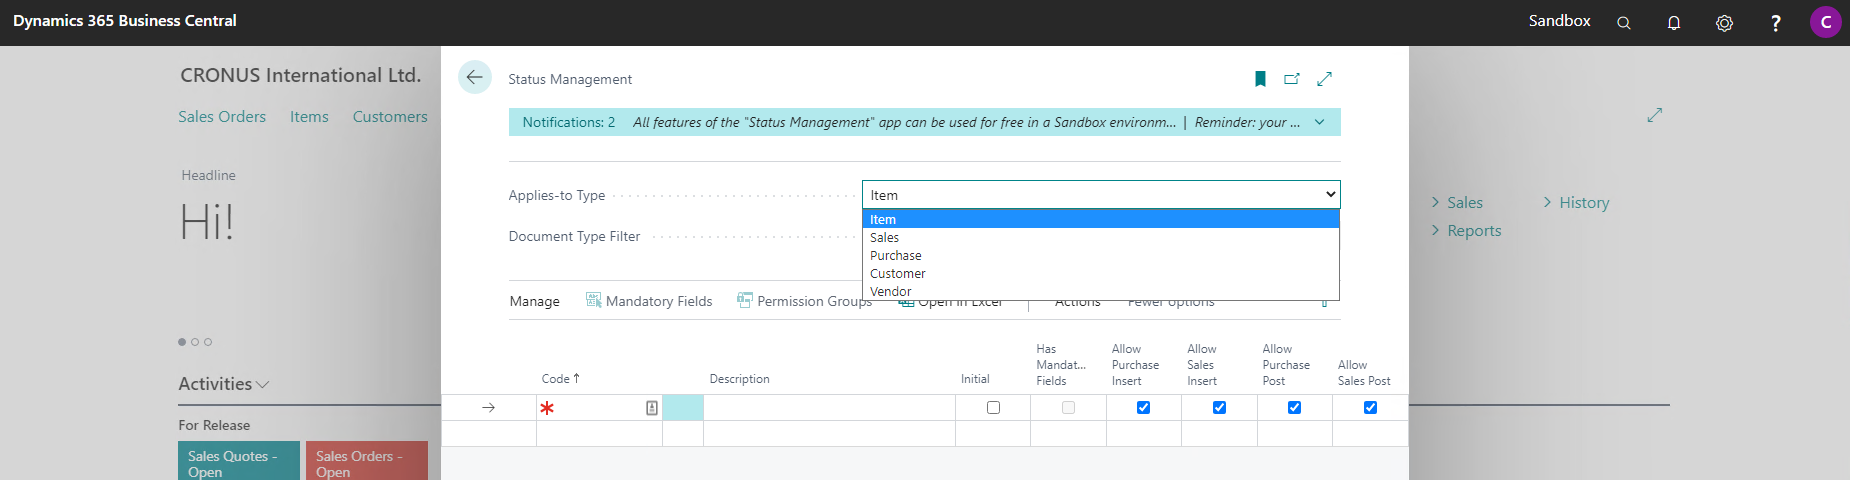
When you have opened the Status Management page you have the option Applies-to Type to configure the lifecycle for Items, Customer, Vendor, Purchase, Sales, Service or Project.
-
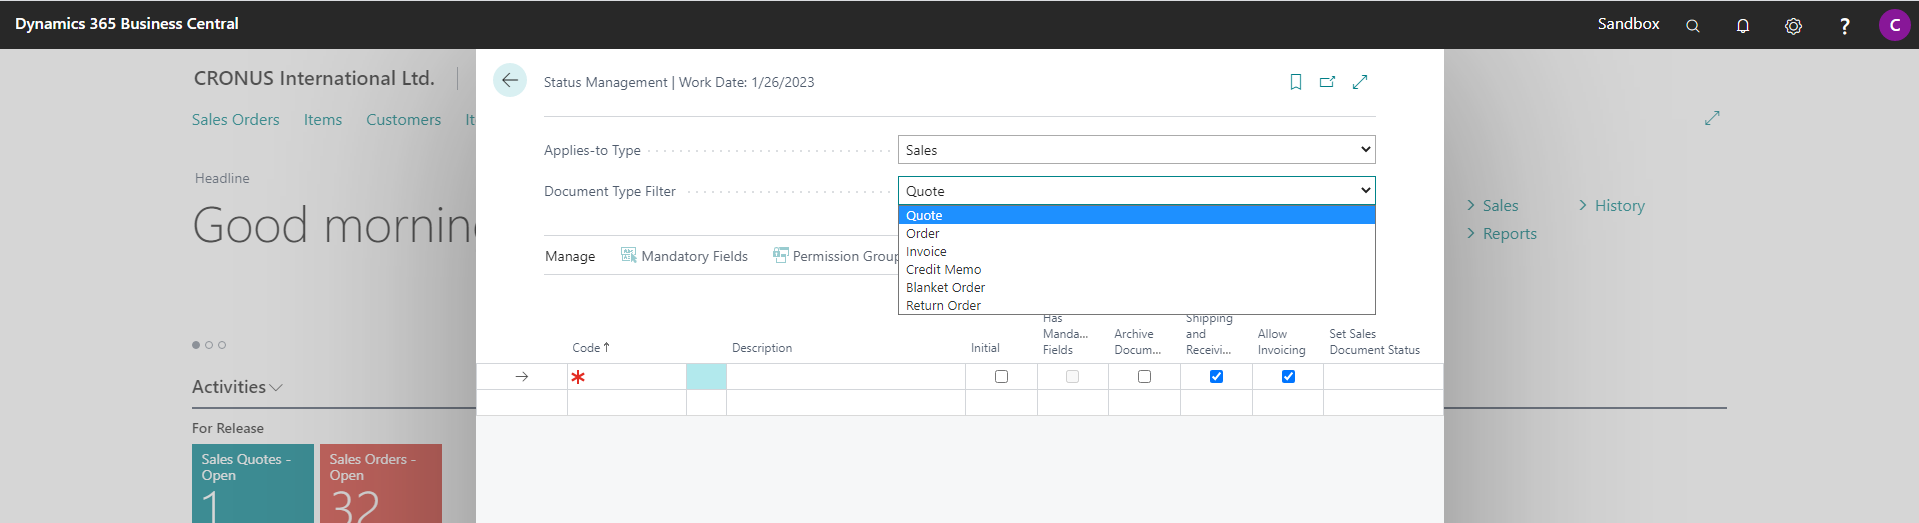
If you have selected Sales or Purchase the option Document Type Filter is activated to be able to select for which document type you would like to configure the Statuses.
-
Once you have selected the desired Applies-to Type and if also required the Document Type Filter, follow & repeat the following five steps for each desired Status of your lifecycle.
-
Create a new Status
-
Configure the Status settings
a. For Items
b. For Purchase, Sales and Service documents
c. For Customers and Vendors
d. For Projects
-
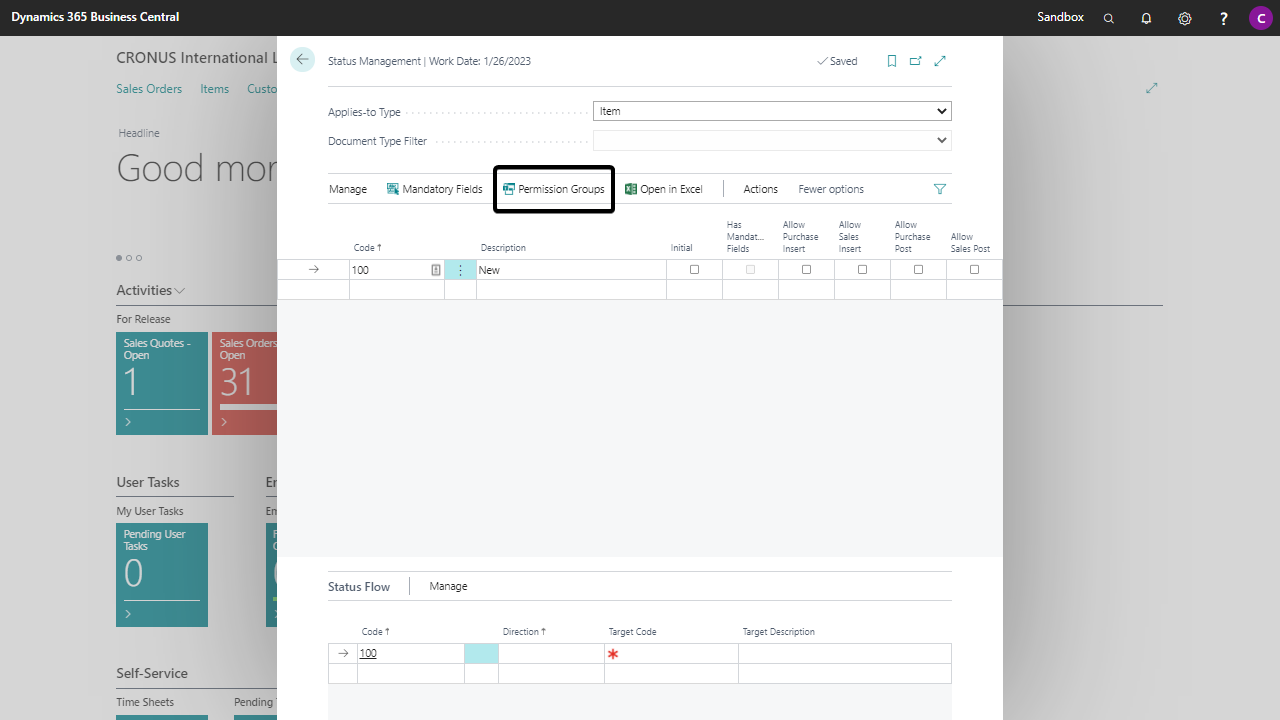
Set up the Permission Groups
-
Set up the Status Flow
-
Set up the Mandatory Fields
-
Create a New Status
-
Click on an empty line or create a new line
-
Fill in the Code and Description of the Status. It will be convenient to use an alphanumerical ordering of the Codes which are going to be used (e.g. 100, 200, …)

Configure the Status settings for Items
Configure the settings of the Status by configuring the specified fields below:
-
Initial You can select one Status in each lifecycle to be used as the initial Status. When you create an Item, the initial Status will be the Status that will be assigned.
-
Hide Items with Status If this checkbox is checked, Items with this status are hidden from lookups (in documents). In list overviews there is a button in the ribbon to Hide Items or Show All Items.
-
Allow Purchase Insert In the dropdown you can select for which Document Types Items with this Status are allowed to be inserted in Purchase documents.
-
Allow Sales Insert In the dropdown you can select for which Document Types Items with this Status are allowed to be inserted in Sales documents.
-
Allow Service Insert In the dropdown you can select for which Document Types Items with this Status are allowed to be inserted in Service documents.
-
Allow Purchase Post If this checkbox is checked, Items with this Status are allowed to be posted in Purchase Documents.
-
Allow Sales Post If this checkbox is checked, Items with this Status are allowed to be posted in Sales Documents.
Configure the Status settings for Customers
Configure the settings of the Status by configuring the specified fields below:
-
Initial You can select one status in each lifecycle to be used as the initial Status. When you create a customer, the initial status will be the status that will be assigned.
-
Allow Sales Insert In the dropdown you can select for which Document Types Customers with this Status are allowed to be inserted in Sales documents.
-
Allow Service Insert In the dropdown you can select for which Document Types Customers with this Status are allowed to be inserted in Service documents.
-
Allow Sales Post If this checkbox is checked, Customers with this Status are allowed to have Sales documents posted.
-
Allow Release Sales Document If this checkbox is checked, Customers with this Status are allowed to have Sales documents to be released.
-
Allow Release Service Document If this checkbox is checked, Customers with this Status are allowed to have Service documents to be released.
Configure the Status settings for Vendors
Configure the settings of the Status by configuring the specified fields below:
-
Initial You can select one Status in each lifecycle to be used as the initial Status. When you create a Vendor, the initial Status will be the Status that will be assigned.
-
Allow Purchase Insert In the dropdown you can select for which Document Types Vendors with this Status are allowed to be inserted in Purchase documents.
-
Allow Purchase Post If this checkbox is checked, Vendors with this Status are allowed to have Purchase documents posted.
-
Allow Release Purchase Document If this checkbox is checked, Vendors with this Status are allowed to have Purchase documents to be released.
Configure the Status settings for Purchase and Sales Documents
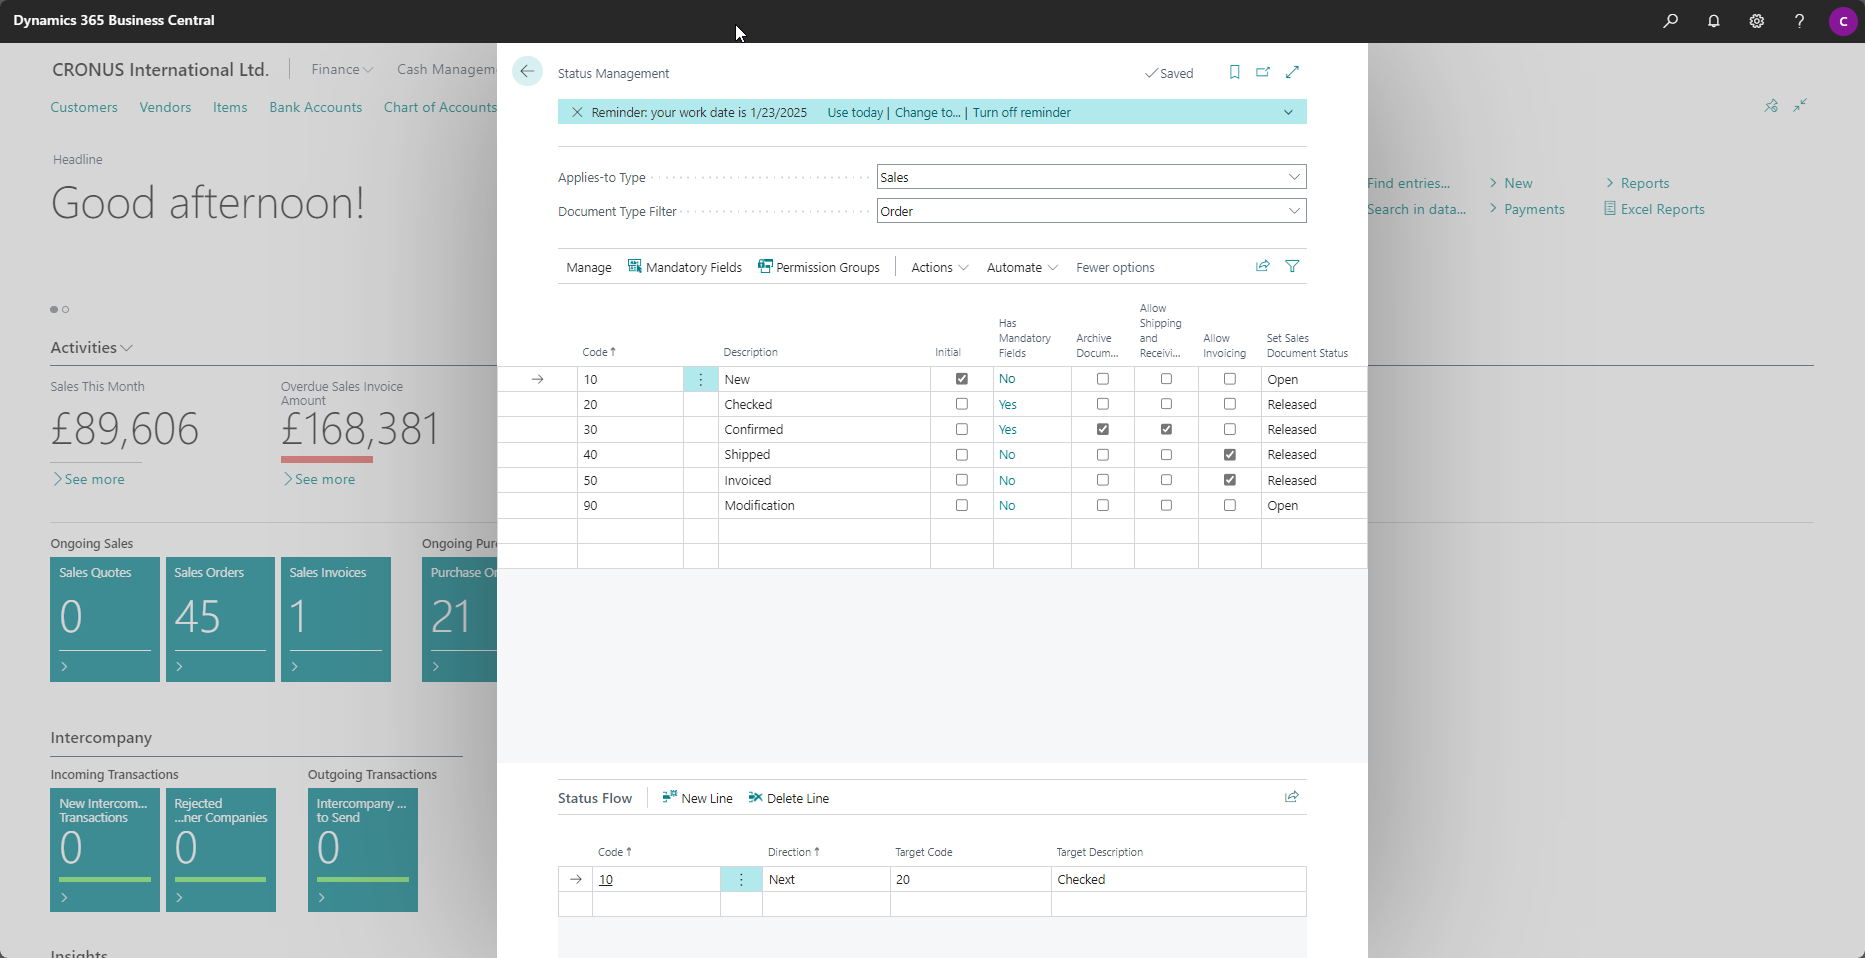
Configure the settings of the Status by configuring the specified fields below:
-
Initial You can select one Status in each lifecycle to be used as the initial Status. When you create a Purchase or Sales document, the initial Status will be the Status that will be assigned.
-
Archive Document If this checkbox is checked, an archive version of the document will be created when the document is set to this Status.
-
Allow Shipping and Receiving If this checkbox is selected (and provided the Document Type enables it), it is allowed to post a Shipment (Sales) or Receipt (Purchase) for a document with this Status, otherwise this is disallowed.
-
Allow Invoicing If this checkbox is selected (and provided the Document Type enables it), it is allowed to invoice a document with this Status, otherwise this is disallowed.
-
Allow Make Order From If this checkbox is selected (and provided the Document Type enables it), it is allowed to create a order with this Status, otherwise this is disallowed. Supported for Purchase- and Sales Quotes and Purchase- and Sales Blanket Orders.
-
Allow Make Invoice From If this checkbox is selected (and provided the Document Type enables it), it is allowed to create a invoice with this Status, otherwise this is disallowed. Supported for Purchase- and Sales Quotes.
-
Set Sales/Purch. Document Status In this setting you can configure the main Status (Released / Open), which will be set automatically, when the lifecycle is set to this Status. If this setting remains blank, the Document Status will not be changed. If you work with the Approval Workflows you can also set this field to In Approval. When the Status is being set to Next, the system will create the related Approval Workflow.
-
Allow Release/Reopen Set the option to allow or disallow the document in the Status to be released or reopened.
Configure the Status settings for Service Documents
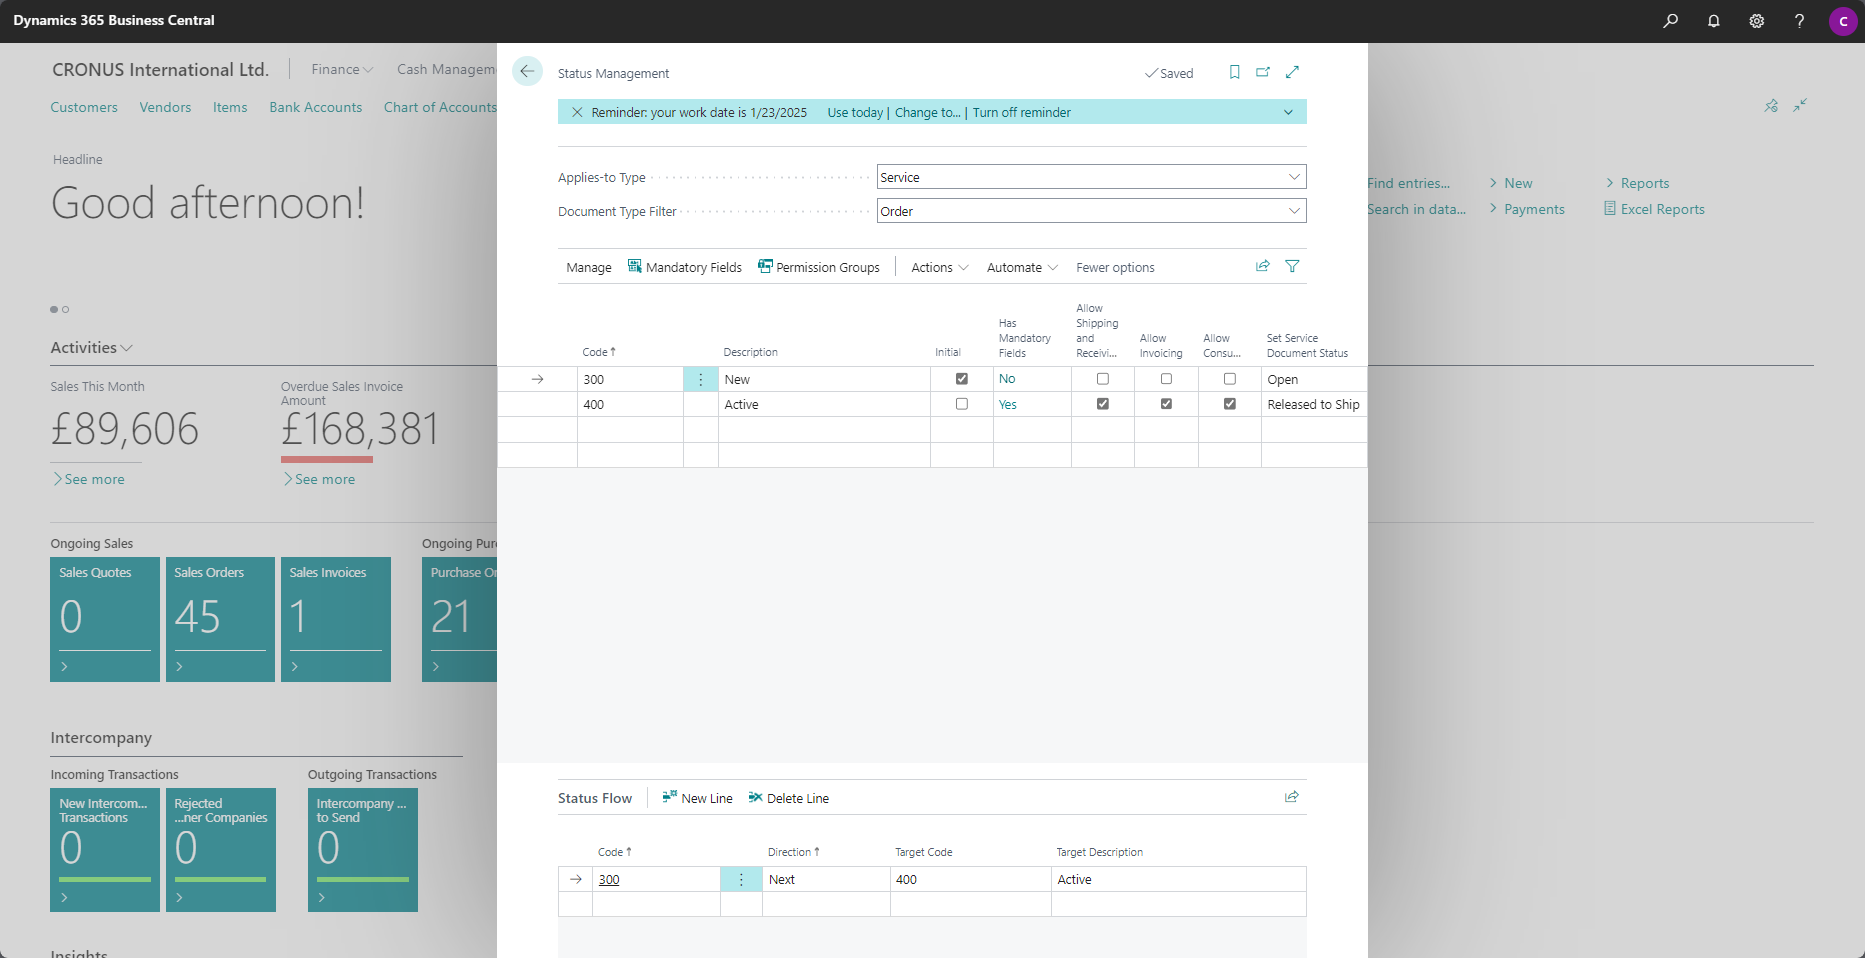
Configure the settings of the Status by (un-)checking the boxes specified below:
-
Initial You can select one status in each lifecycle to be used as the initial Status. When you create a Service document, the initial Status will be the Status that will be assigned.
-
Allow Shipping and Receiving If this checkbox is selected (and provided the Document Type enables it), it is allowed to post a shipment for a document with this Status, otherwise this is disallowed.
-
Allow Invoicing If this checkbox is selected (and provided the Document Type enables it), it is allowed to invoice a document with this Status, otherwise this is disallowed.
-
Allow Consumption If this checkbox is selected (and provided the Document Type enables it), it is allowed to post consumption a document with this Status, otherwise this is disallowed.
-
Allow Make Order From If this checkbox is selected (and provided the Document Type enables it), it is allowed to create a order with this Status, otherwise this is disallowed. Supported for Service Quotes.
-
Allow Make Invoice From If this checkbox is selected (and provided the Document Type enables it), it is allowed to create a invoice with this Status, otherwise this is disallowed. Supported for Service Quotes.
-
Set Service Document Status In this setting you can configure the main Status (Open / Released to Ship), which will be set automatically, when the lifecycle is set to this status. If this setting remains blank, the Document Status will not be changed.
Configure the Status settings for Projects
Configure the settings of the Status by (un-)checking the boxes specified below:
-
Initial You can select one Status in each lifecycle to be used as the initial Status. When you create a Project, the initial Status will be the Status that will be assigned.
-
Allow Create Sales Invoice If this checkbox is checked, Projects with this Status are allowed to create Sales Invoices.
-
Allow Post If this checkbox is checked, Projects with this Status are allowed to have usage and Sales- and Purchase documents posted on this Project.
-
Set Project Status In this setting you can configure the Status of the Project which will be set automatically when the lifecycle is set to this status. If this setting remains blank, the Document Status will not be changed.
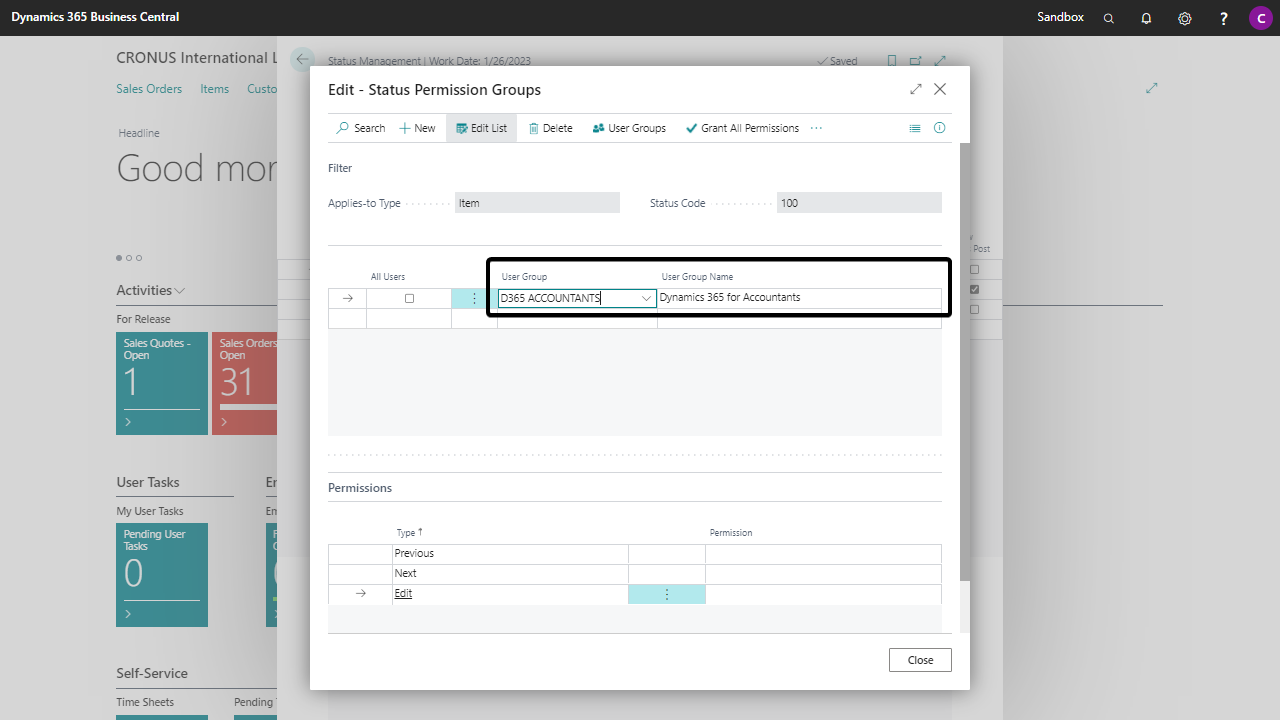
Set up the Permission Groups
You use the Permission Group to set up the permissions of the selected Status.
Caution
Starting from Business Central 2023 release wave 1 (BC22) you can use Security Groups instead of User Groups in Business Central. User Groups have been deprecated and will be removed from Business Central in a future update.
The permission groups of Status Management can be configured for either Security Groups or the deprecated User Groups. The functionality for Status Management remains the same.
Caution
Starting from Business Central 2024 release wave 2 (BC25) User Groups have been deprecated and will be removed from Business Central
Note
You can set up the Permission Groups per Security Group or Permission Set. The functionality for Status Management remains the same.
-
Click on Permission Groups in the ribbon
-
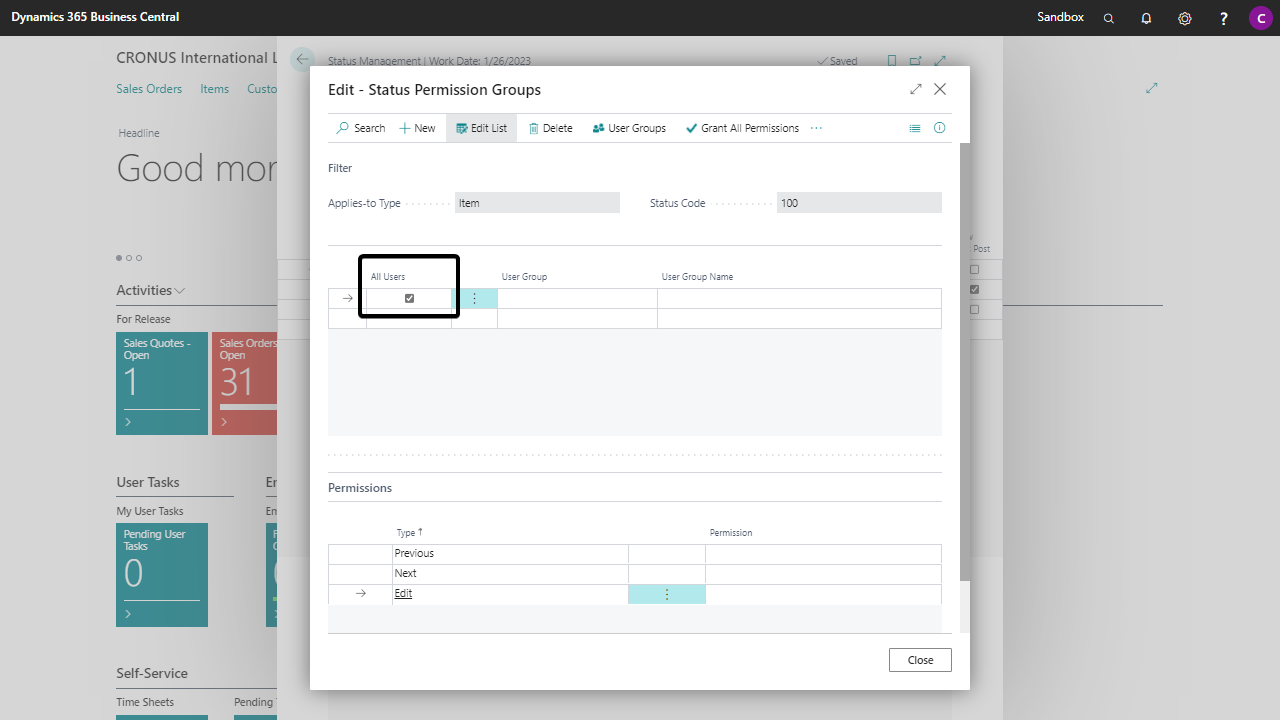
Set up the permissions per Security Group or for all users in one entry.
-
All Users
Check the box All Users in a new line (note: do not fill in the Security Group).
-
Per Security Group
Select the Security Group in the field Security Group in a new line. The field Security Group Name is automatically filled in.
-
Note
You can create new Security Groups, with relevant members, and without any permissions to BC objects if desired, specifically for Status Management.
-
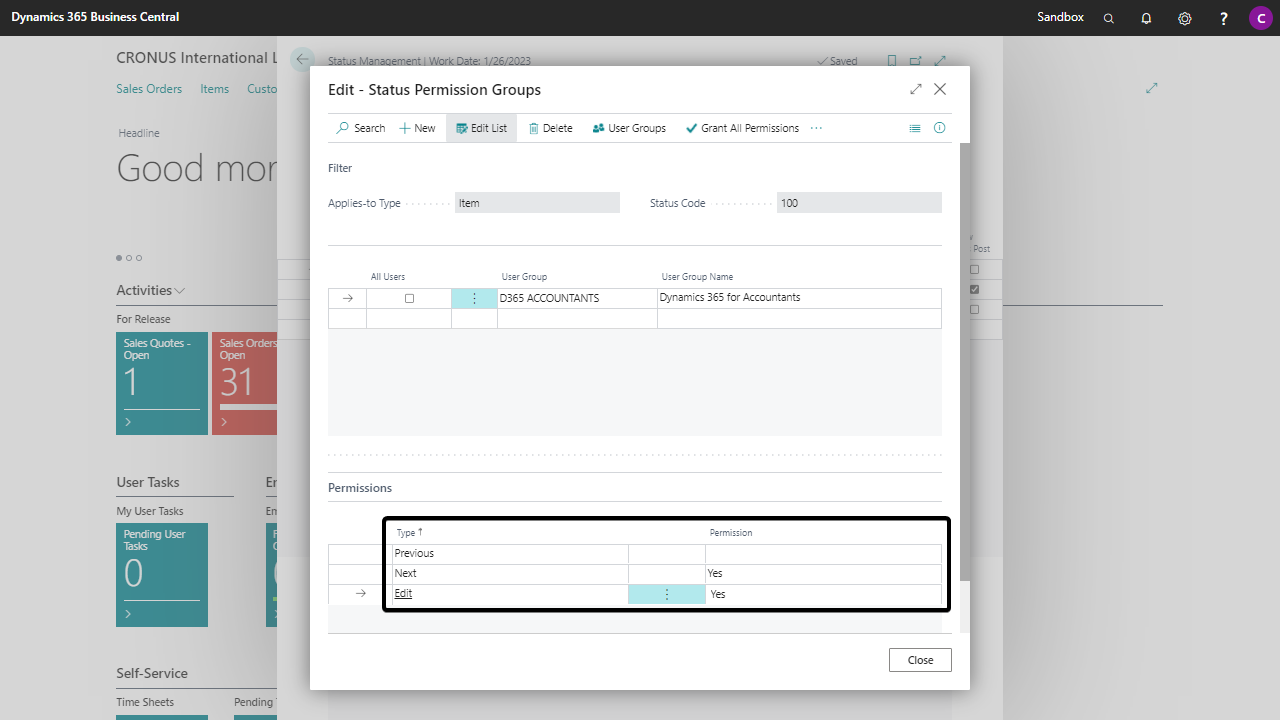
Set up the Permissions per Permission Group.
-
Previous The Permission Group is able to set the record to a previous Status
-
Next The Permission Group is able to set the record to a next Status
-
Edit The Permission Group is able to edit the record
-
Set up the Permission Groups (unhide)
Set up the Permission Groups (unhide) for which Permission Groups are able te unhide the hidden records in the list view.
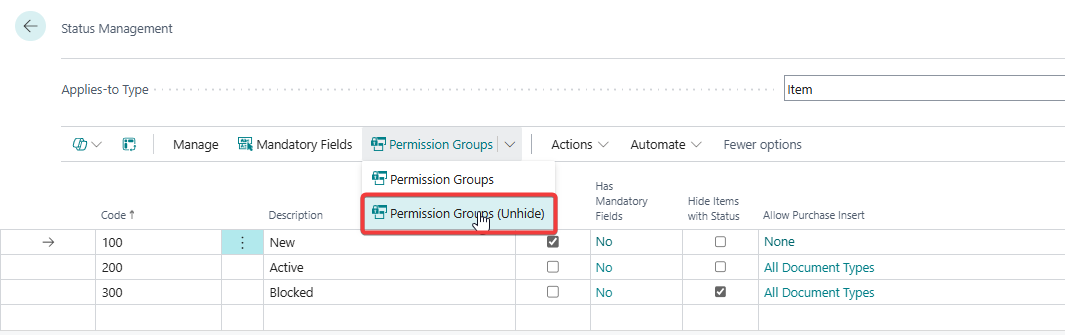
You can set up the Permission Type Unhide Records for the selected Permission Groups. This is per default for all Statuses.

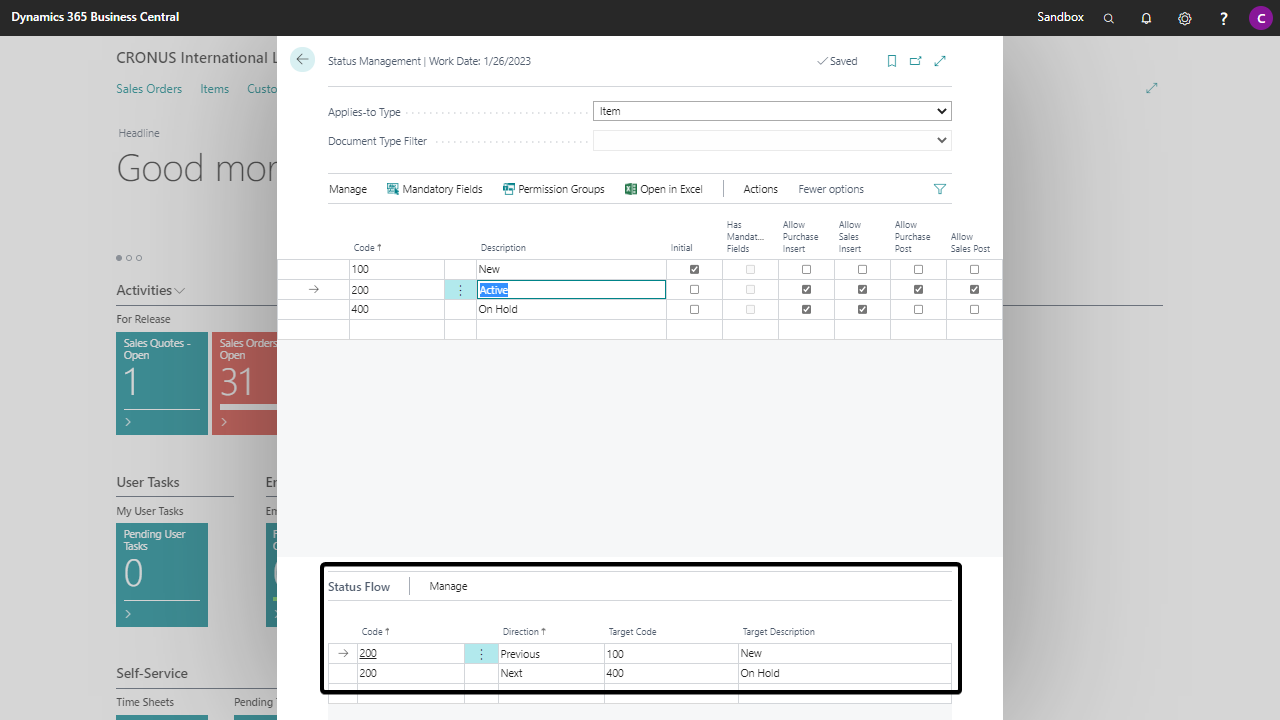
Set up the Status Flow
Defines the flow of the Status by configuring the possibilities for the previous and next Statuses for each Status.
- Create a new Status Flow line
- Set up the Direction: Previous or Next
- Set up the Target Code to define the previous or next Status. The Target Description will be filled automatically.
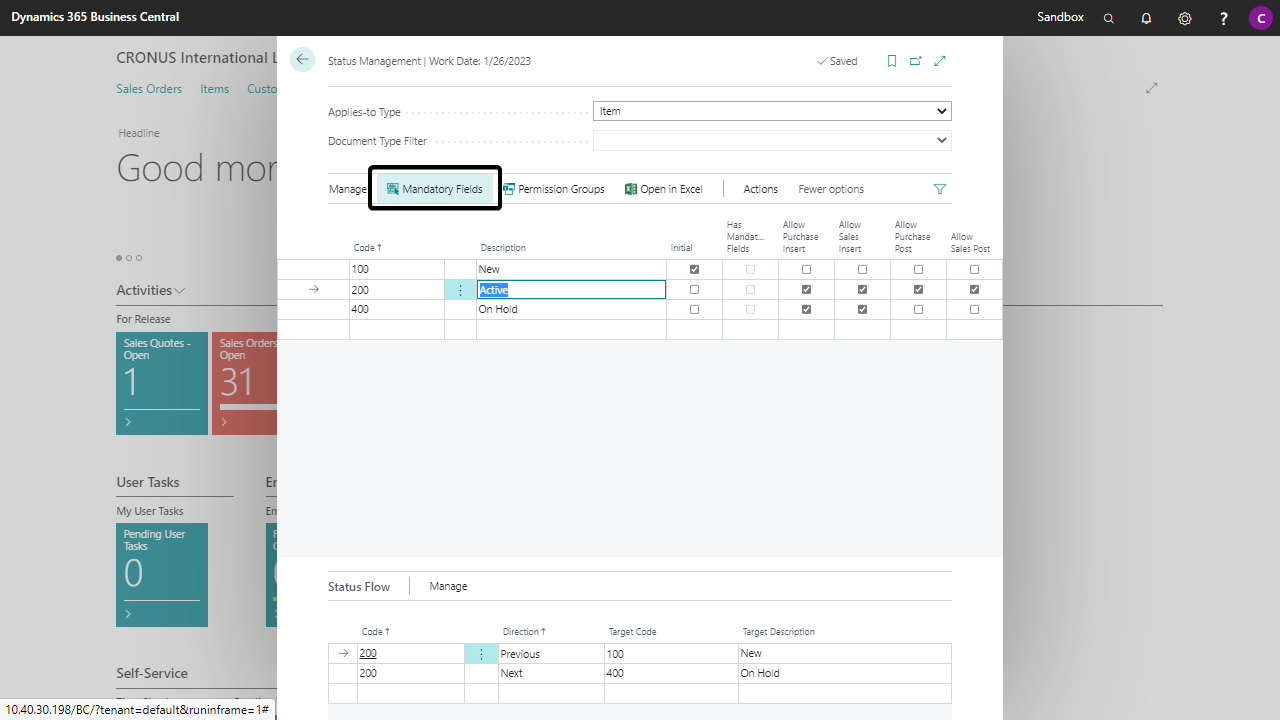
Set up the Mandatory Fields
Set up the Mandatory Fields for each Status to define which fields are mandatory if you set this Status from a previous or next Status.
-
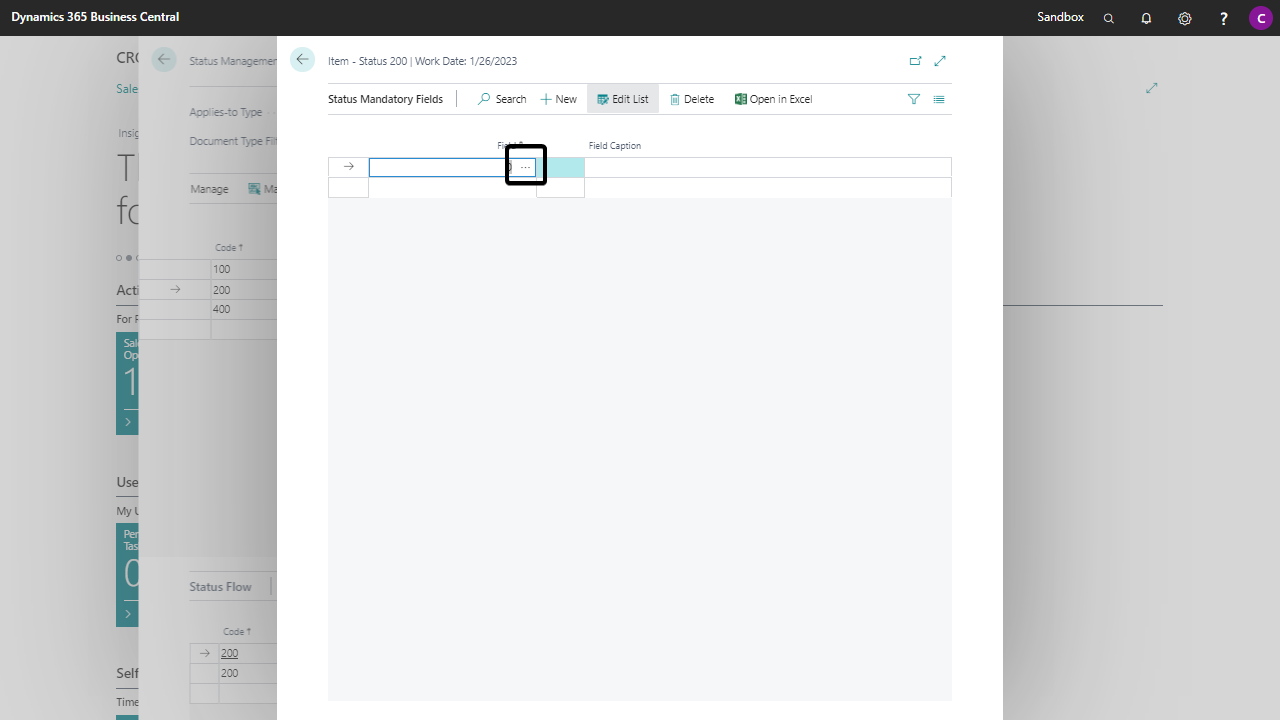
Click on Mandatory Fields in the ribbon
-
Click on the three dots on a new line.
-
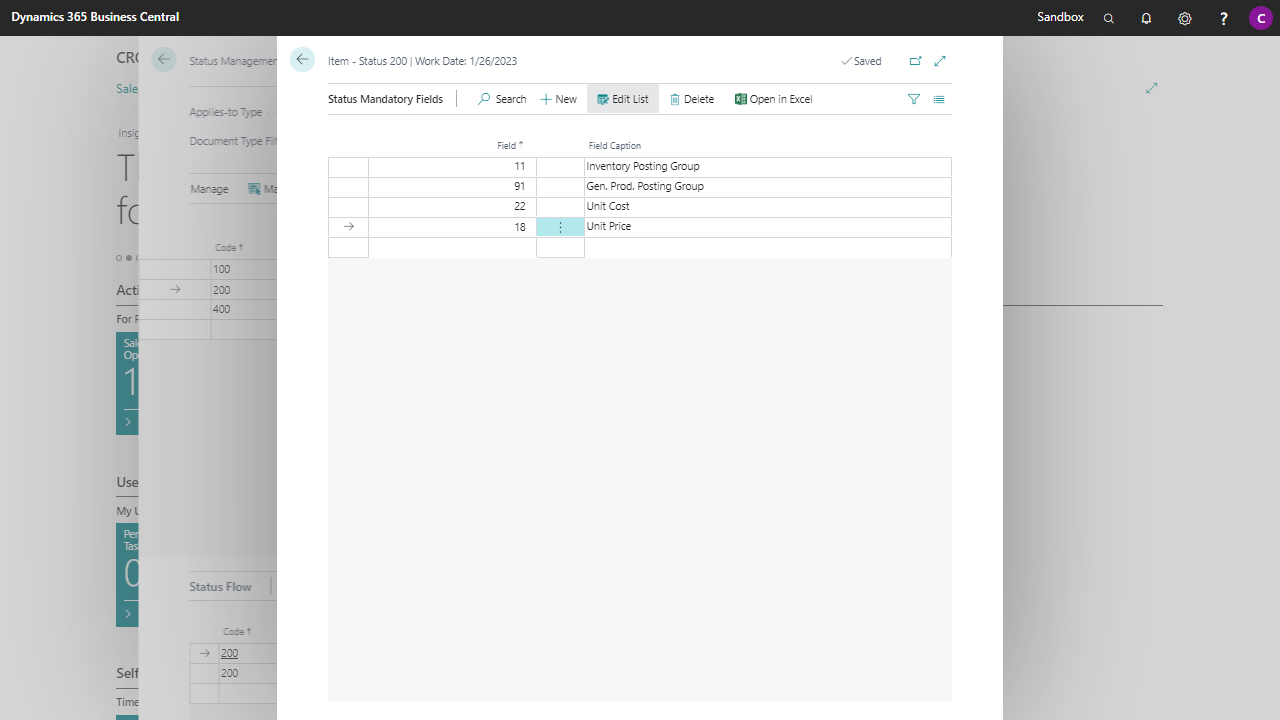
Look up the field you want to set as mandatory and click on OK
-
Repeat this for all the fields you want to set as mandatory. It's also possible to select multiple records on the Select Field page and add them in one click to your list of mandatory fields
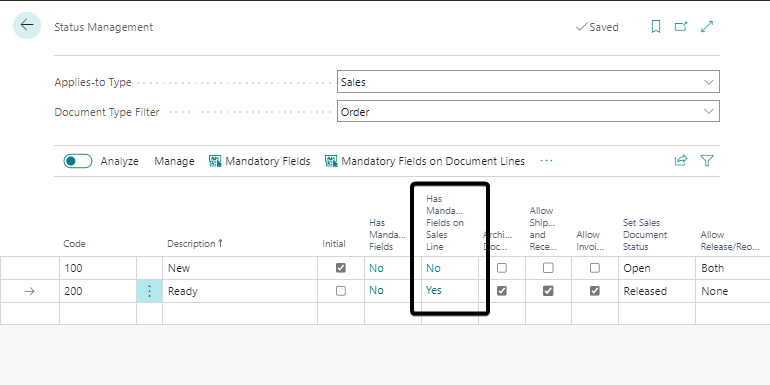
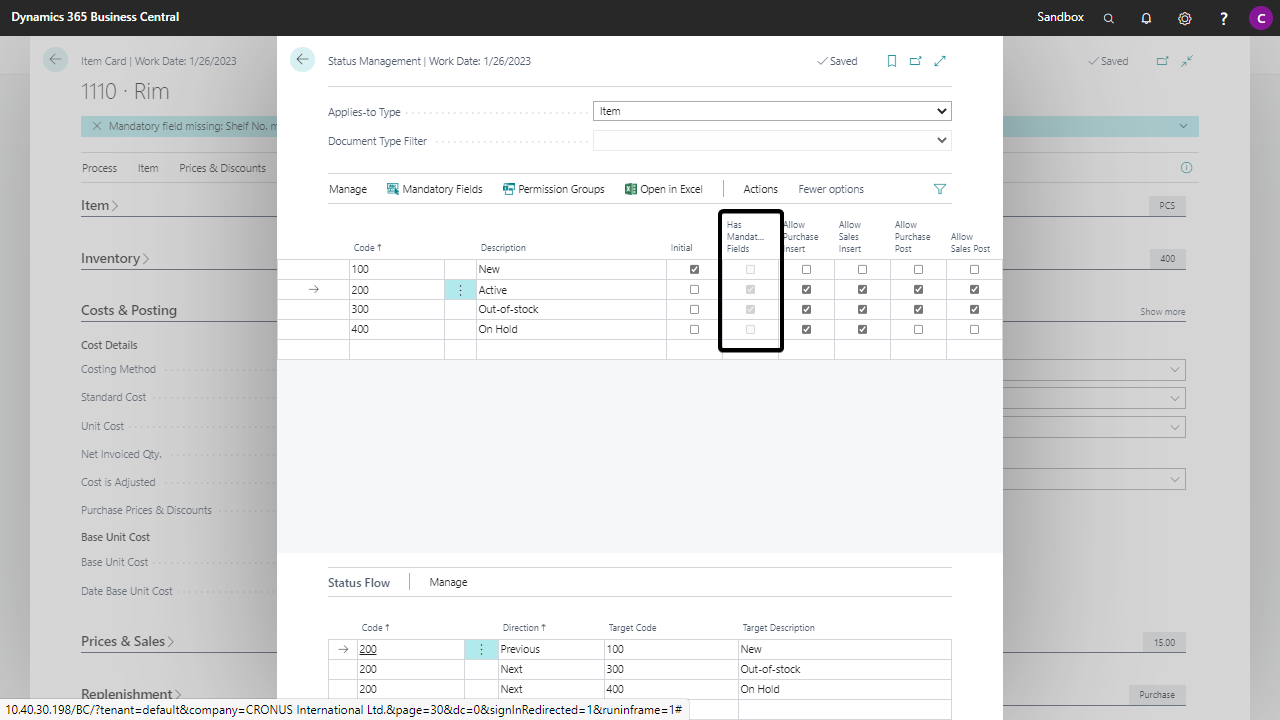
If you have one or more Mandatory Fields set up the field Has Mandatory Fields will be set to Yes in the Status Management page.
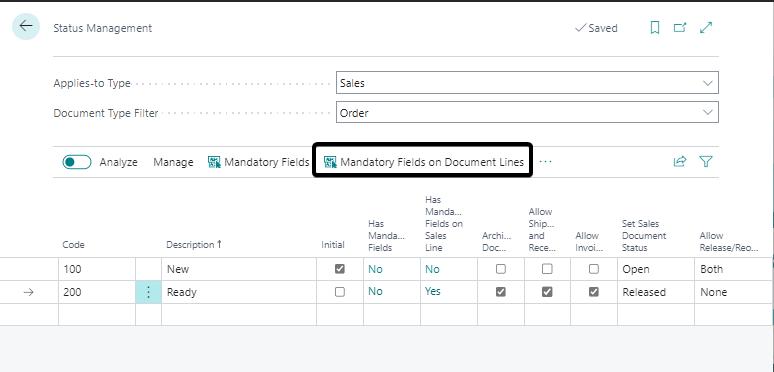
Set up the Mandatory Fields on Document Lines
Set up the Mandatory Fields on Document Lines for each Status to define which fields in the document lines are mandatory if you set this Status from a previous or next Status. Only applies for the Sales and Purchase Documents.
-
Click on Mandatory Fields on Document Lines in the ribbon
-
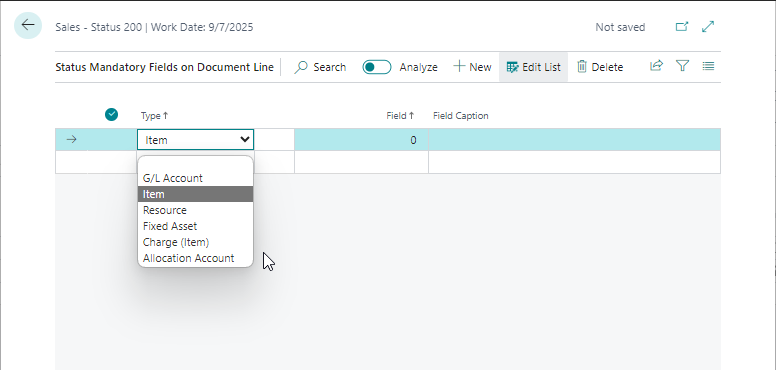
Chooses for which Type the mandatory field applies
-
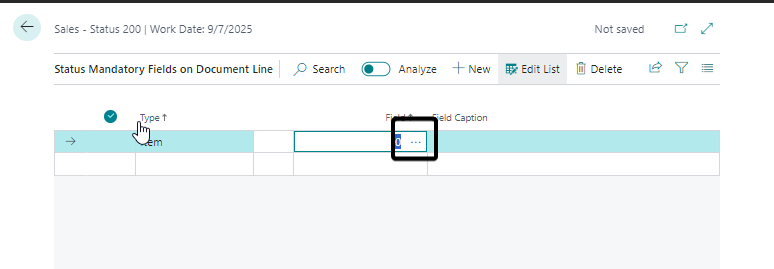
Click on the three dots on the line.
-
Look up the field you want to set as mandatory and click on OK
-
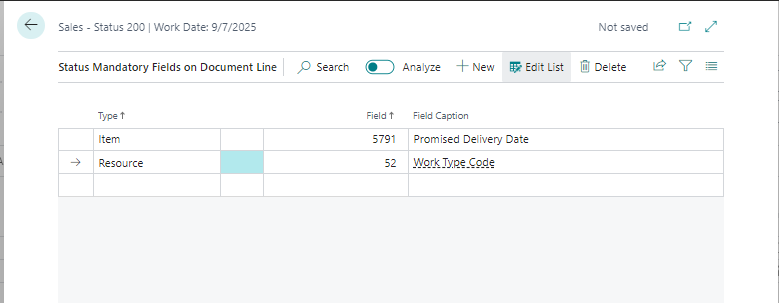
Repeat this for all the fields you want to set as mandatory. It's also possible to select multiple records on the Select Field page and add them in one click to your list of mandatory fields
If you have one or more Mandatory Fields for Document Lines set up the field Has Mandatory Fields on Sales/Purchase Line will be set to Yes in the Status Management page.